Efficiently managing taxes is a crucial part of running a business. It helps you stay organized, follow the rules, and make sure your finances are in order. To make this process easier, we have a feature called Tax Settings in our CRM (Customer Relationship Management) system. This feature allows you to add, manage, and apply taxes in a simple and effective way. It's like having a powerful tool that saves you time, reduces mistakes, and makes your financial operations smoother.
How Taxes Fit into Your Business Software
In addition to Tax Settings, if you're a SaaS (Software as a Service) company operating in places like the EU, UK, or North America, we have a workaround using Stripe tax management. This temporary solution helps you manage taxes better and comply with regional tax rules. It also improves the experience for your customers when they make payments for your services.
Imagine your business software as a super-smart assistant. It's designed to make your life easier, and by using Tax Settings, you save time and reduce the chances of making mistakes. You can also get better at understanding your business's finances because it keeps everything neat and organized.
How Tax Settings Work in Our CRM:
Step 1: Creating and Adding Taxes:
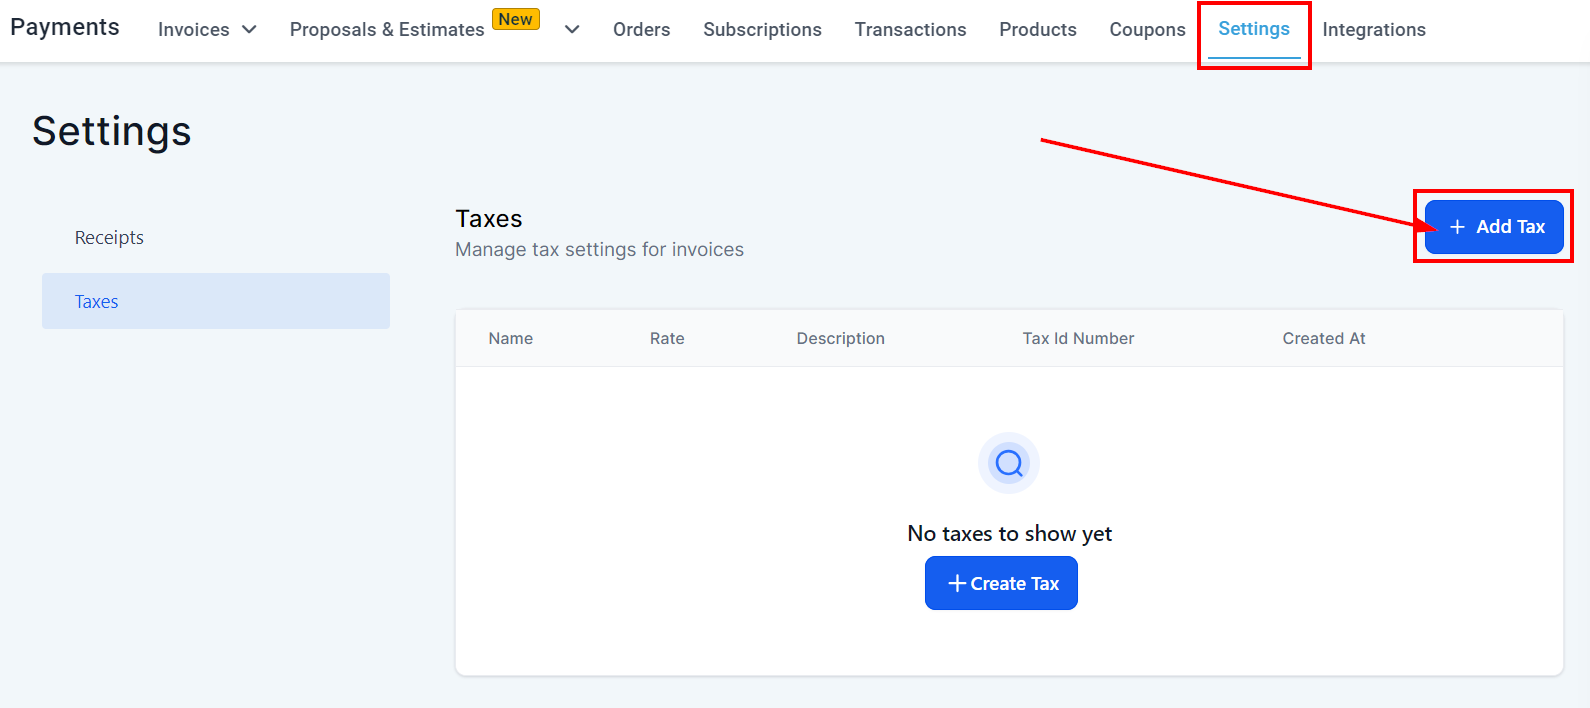
- Go to Payments > Tax Settings.
- Click "Add Tax."
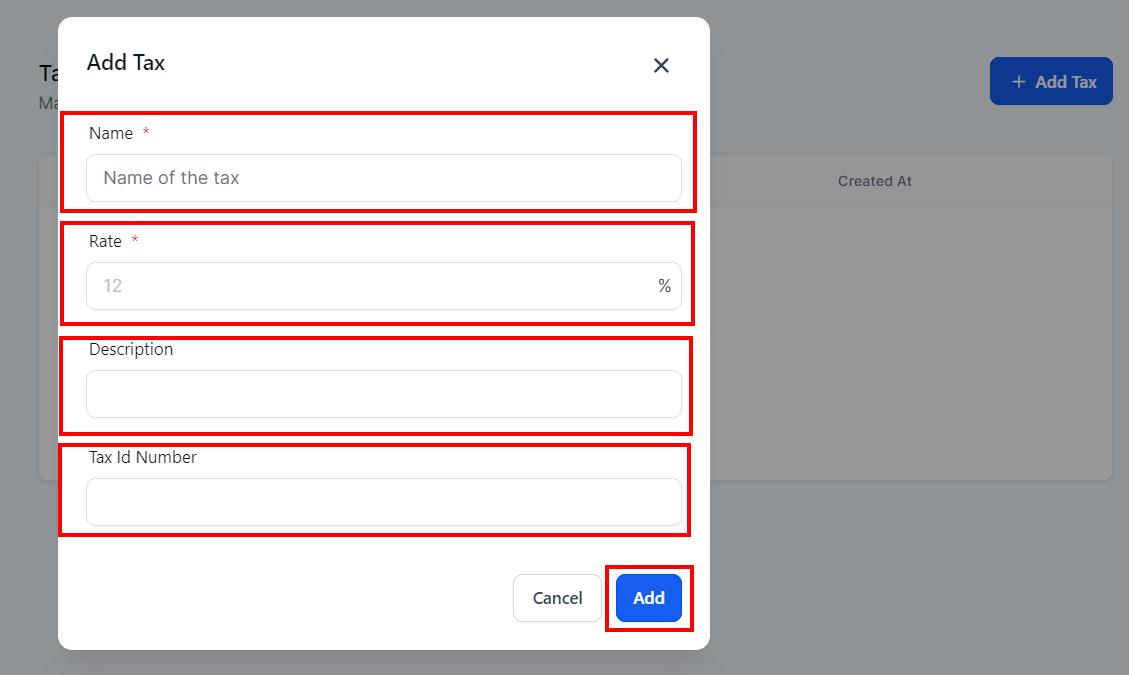
- Fill in the necessary details like the tax name, how much it is as a percentage, a description (if you want), and the tax ID number (if applicable).
- Click "Add Tax." Now, this tax will be on your list of taxes.
Step 2: Managing Taxes:
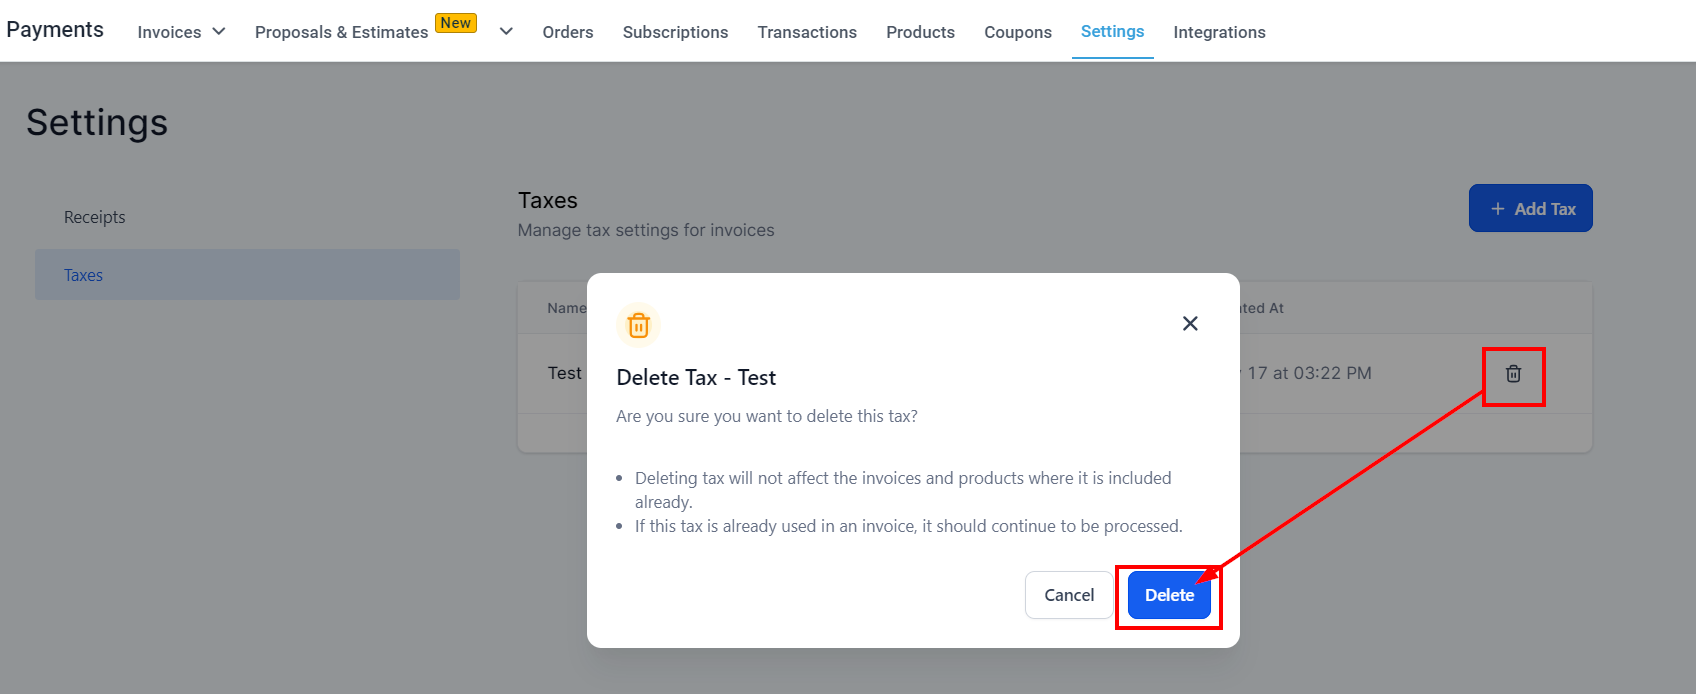
- You can delete a tax by using the "Actions" dropdown on the right.
Important Note:
- Right now, you can only use the Tax Settings feature for invoices, and it's not available for funnel checkouts.
Using Your Taxes in Invoice
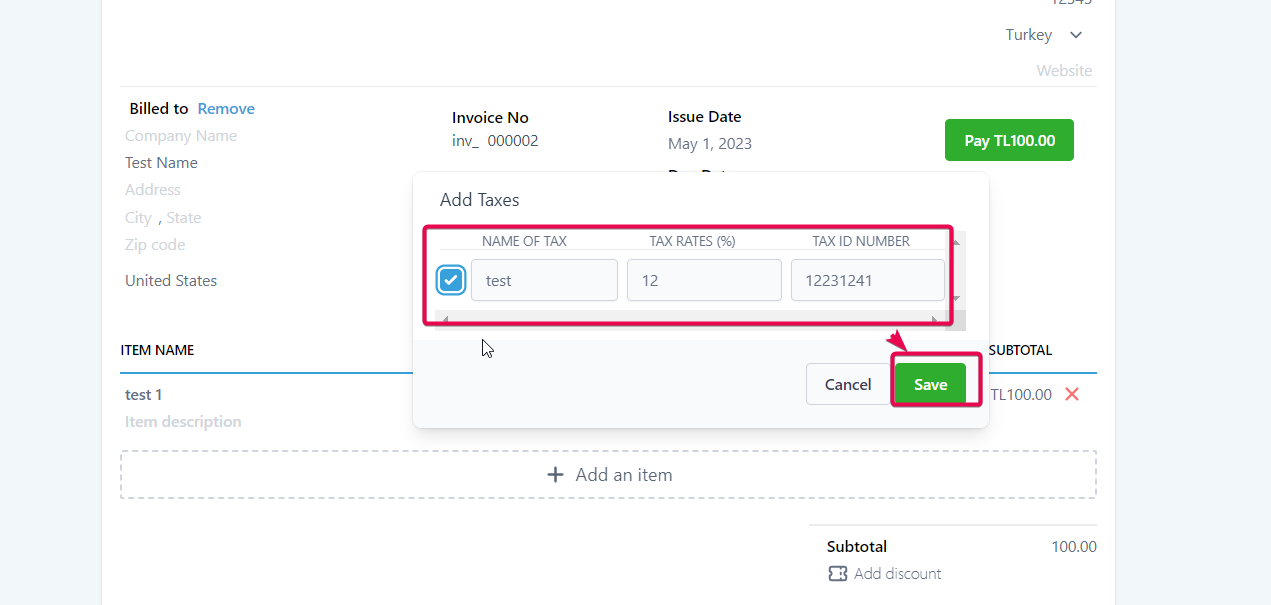
- Head to
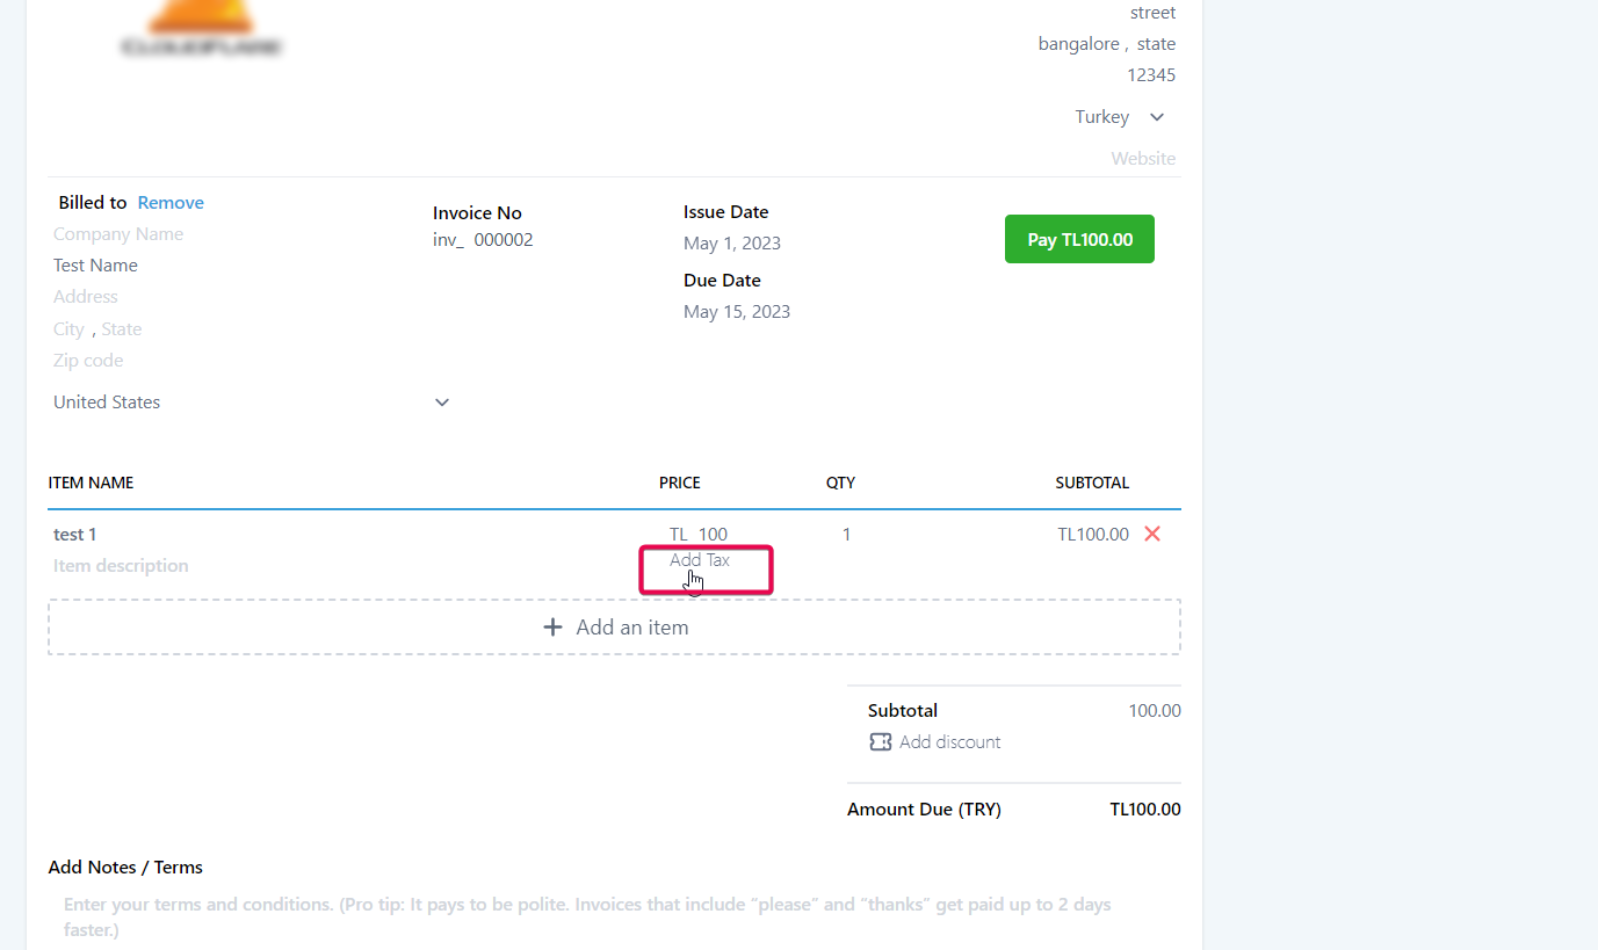
- In the
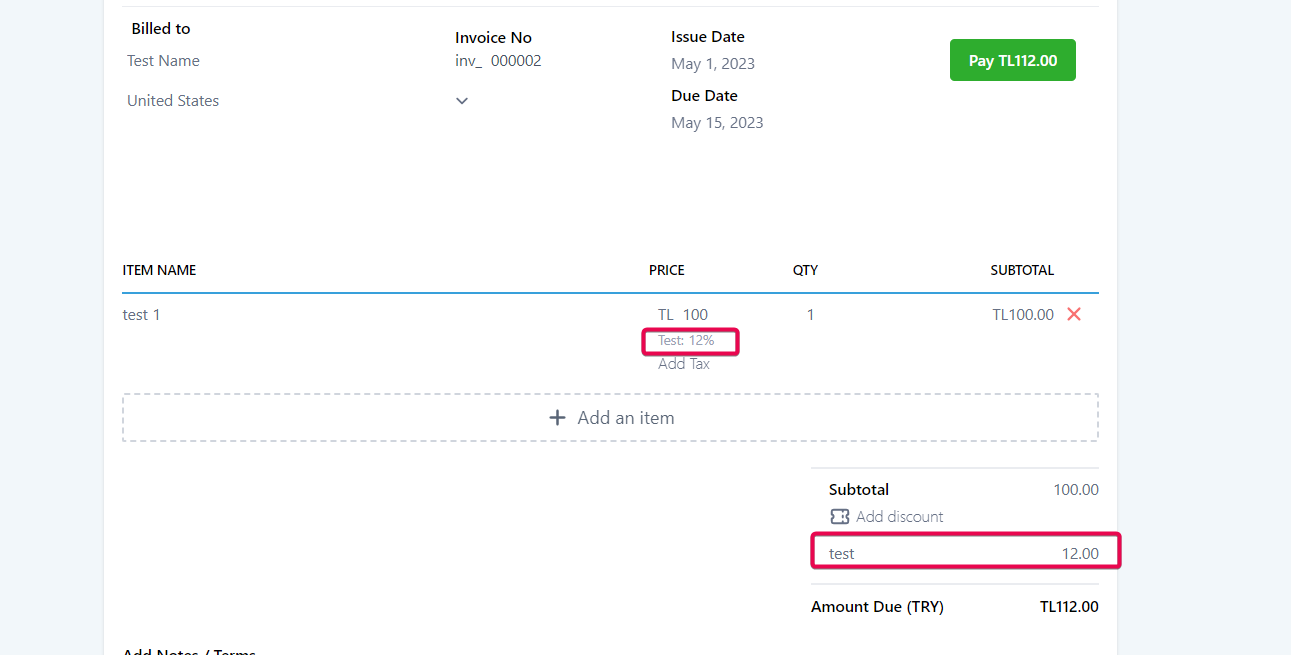
- Click Save to confirm your changes. The tax(es) will be calculated in the invoice.
How to use Taxes in SAAS Payment Links?
If you're a SaaS company, you can also use Stripe's tax management to handle taxes more efficiently. Here's how:
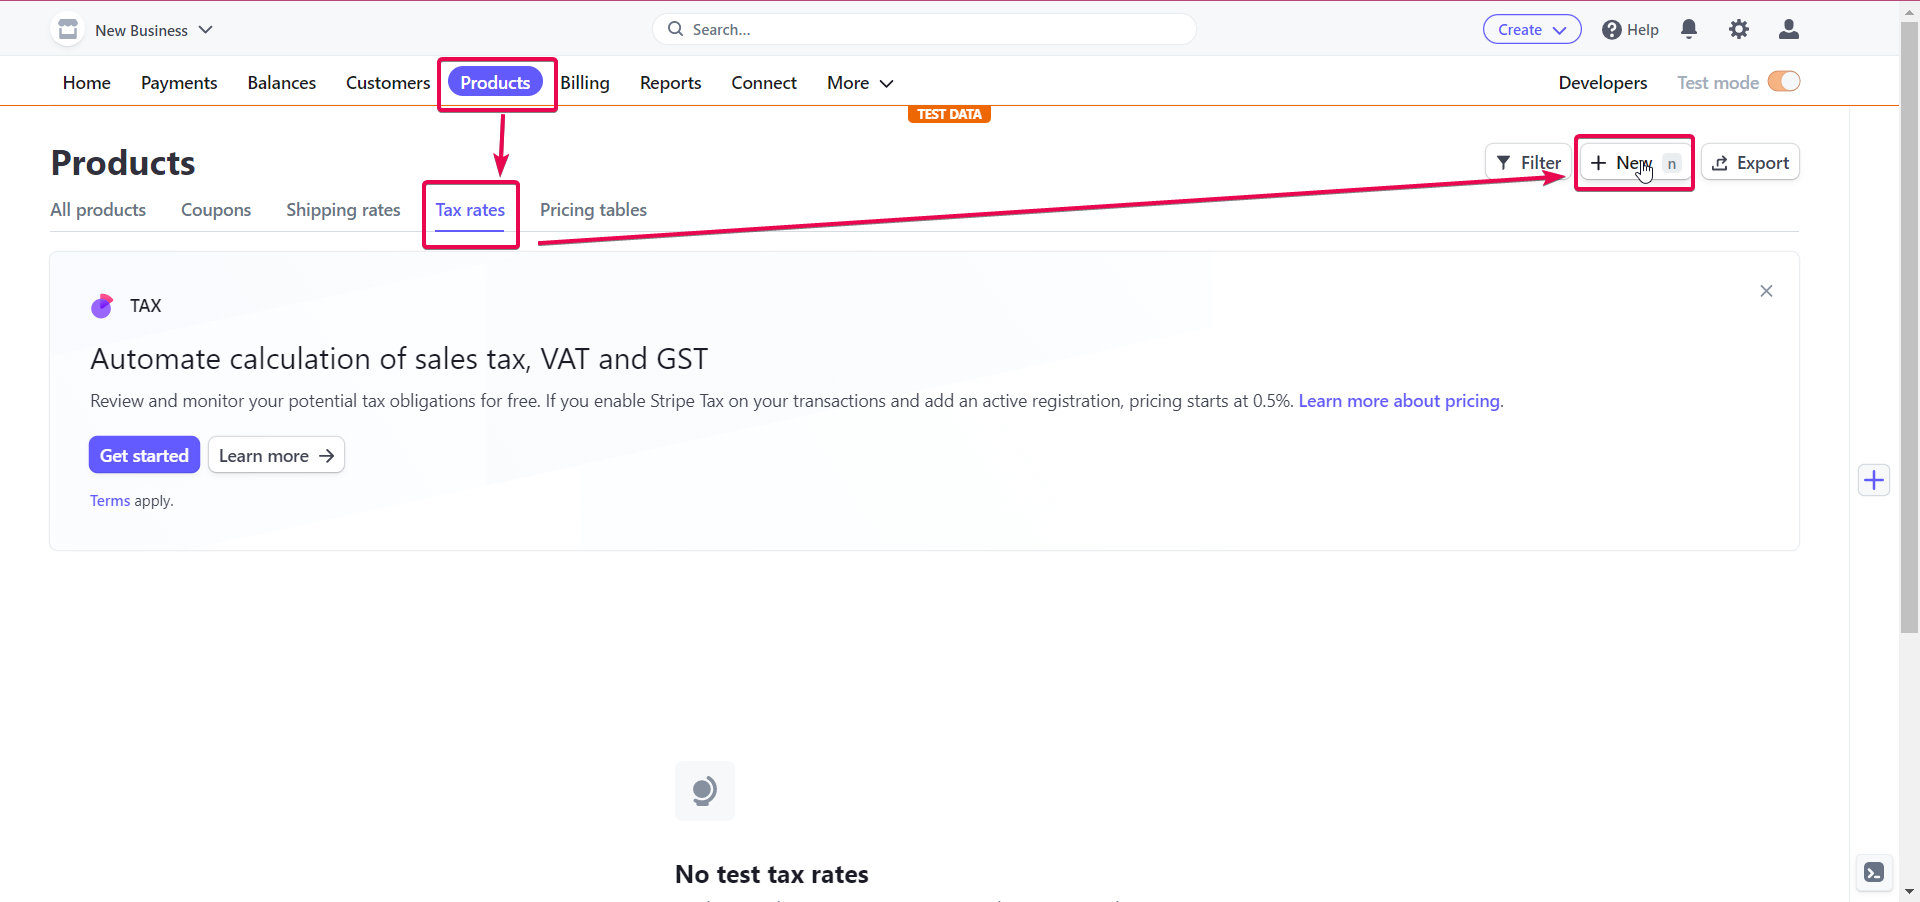
Setting up Tax Rates in Stripe:
- Log in to your Stripe account.
- Go to "
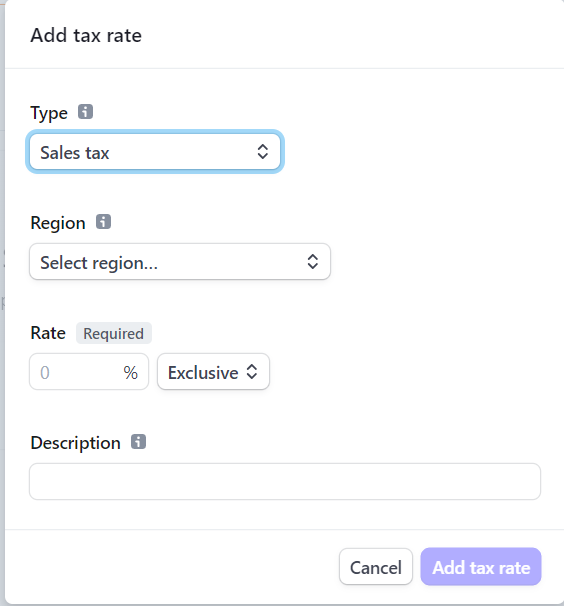
- Fill in details like the tax name, the percentage rate, and whether it's included in the price or added on top of it.
- Click
Applying Tax Rates to Customers
- In Stripe, go to
- Select the customer whose subscription you want to change.
- Click
- Under
- Save your changes to apply the tax rate to the customer's subscription.
Adding Tax Rates for New Customers:
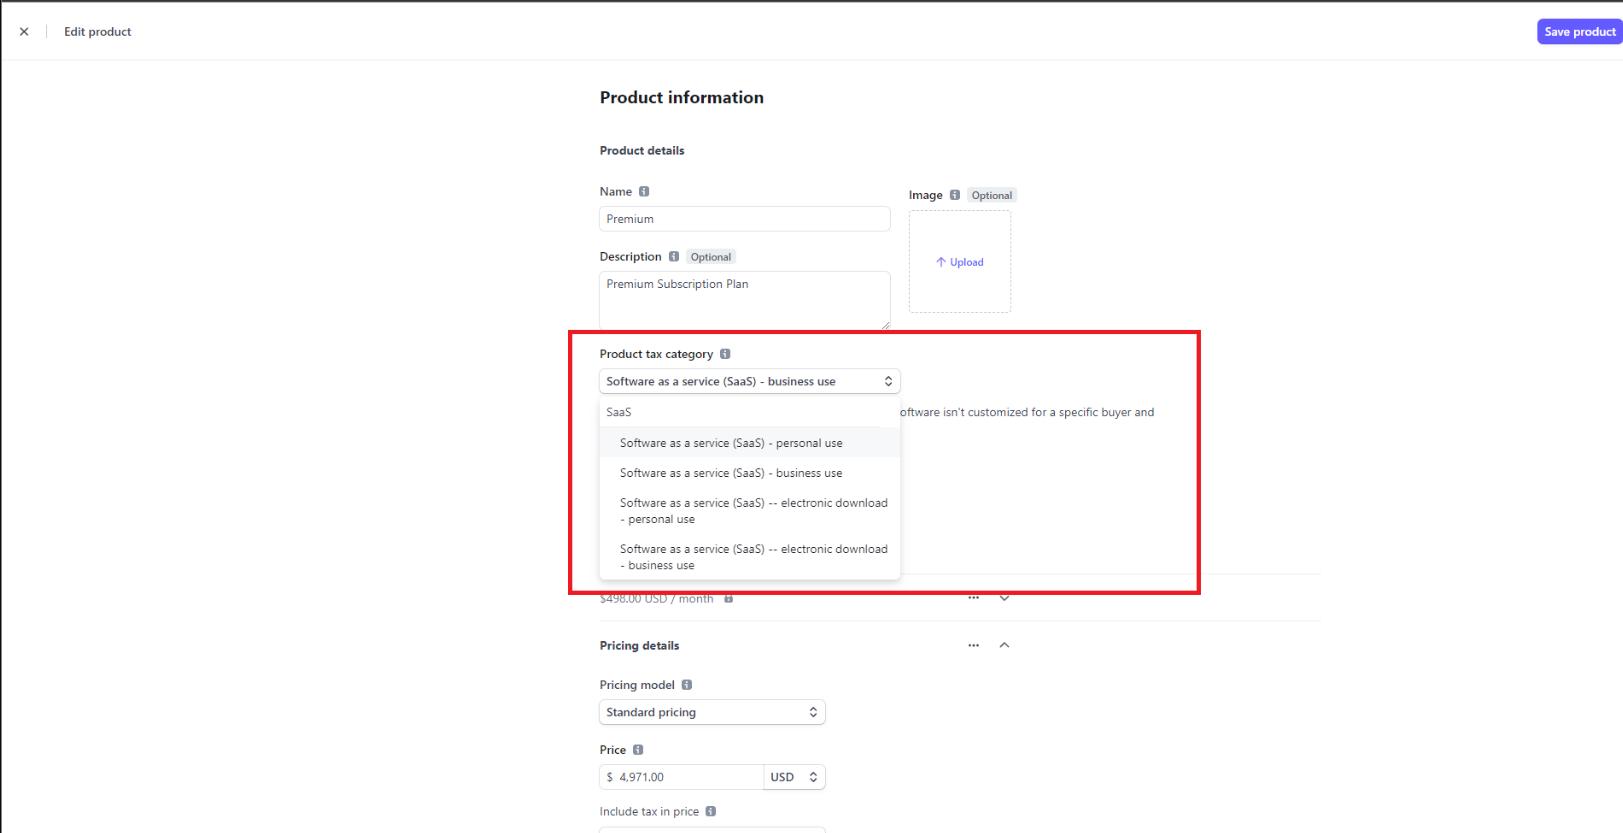
Once you've set up Stripe's Tax management service, you can select tax categories for your SaaS products.
Share Your SaaS Link
- Follow the instructions to add your created tax rate to your SaaS product payment link.
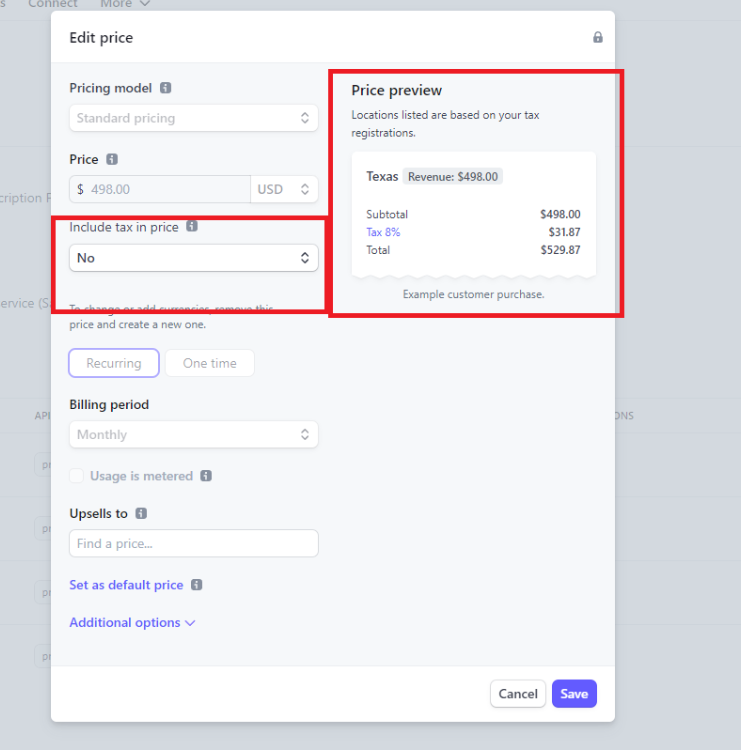
- You may also need to decide whether to include taxes in your prices or charge them separately for each product.
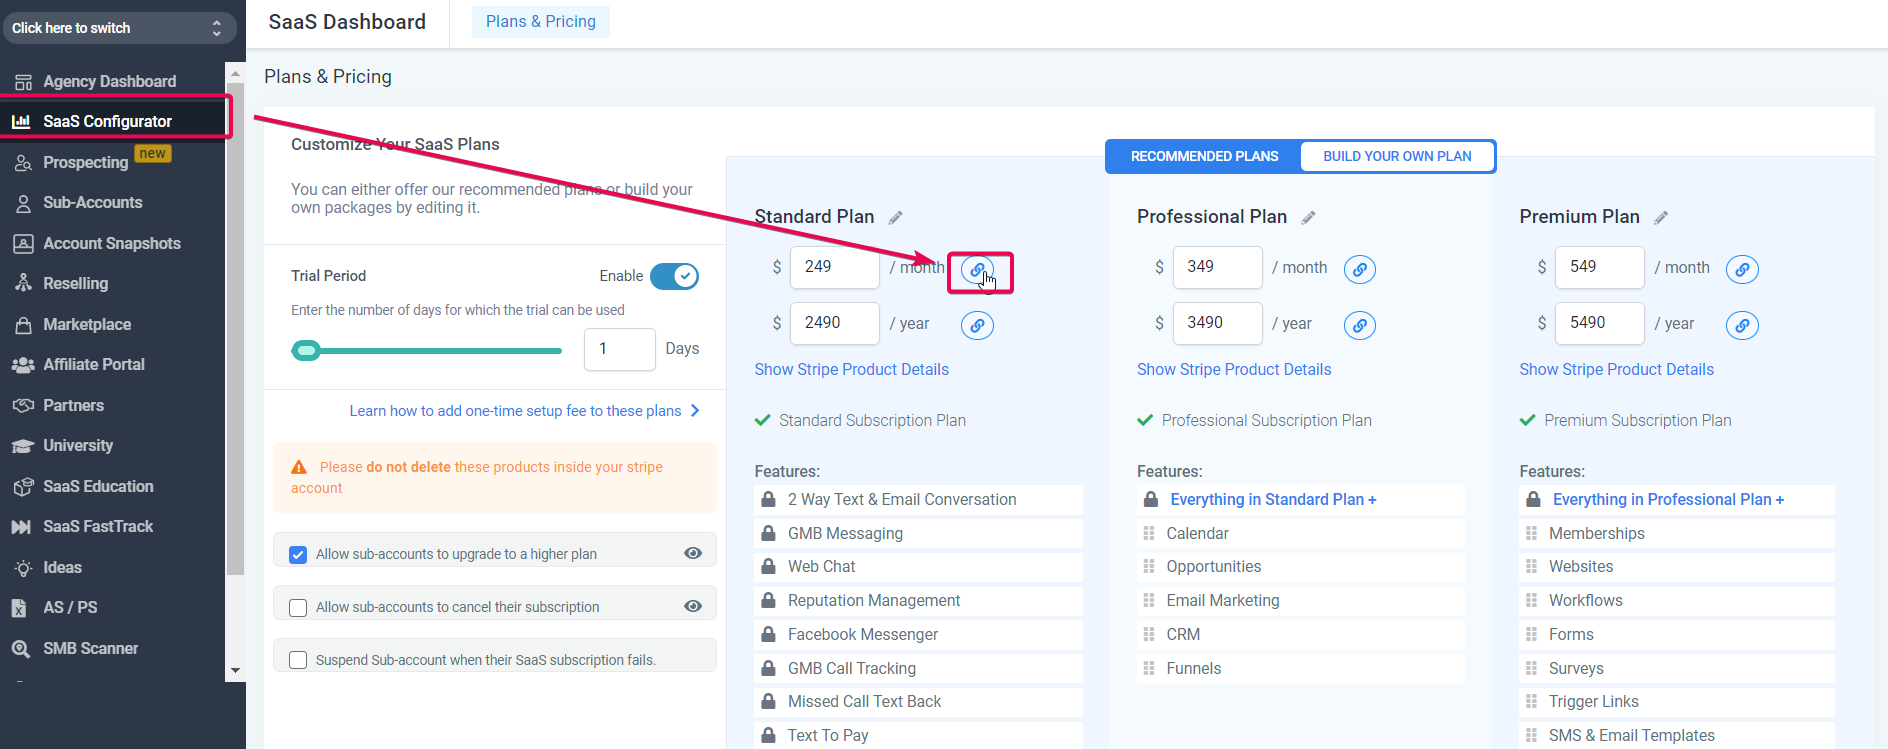
- Copy the SaaS payment link and share it with your customers.
Important Note:
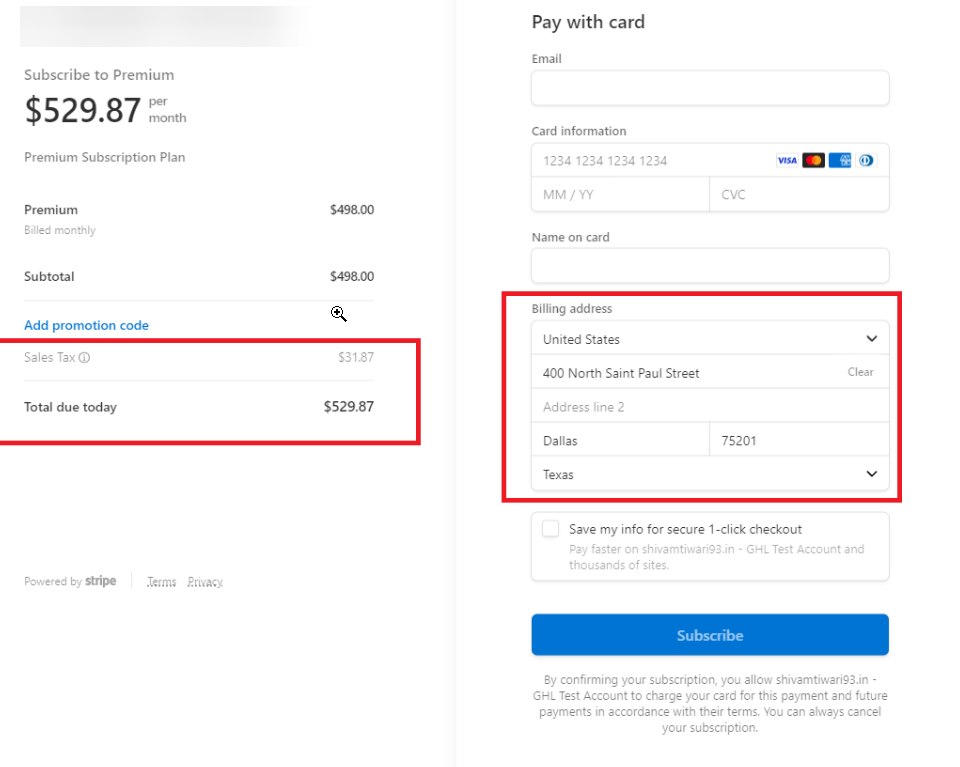
- This Stripe tax management method is only available for SaaS direct payment links and not for funnel sales. It's a temporary solution until a more comprehensive tax management system is developed.
By following these steps, you can efficiently manage taxes for your business and make sure you're following the rules in your region. It's like having a helpful tool that simplifies things and keeps your financial operations running smoothly.
FAQs
How do I handle tax exemptions for specific customers using the CRM Tax Settings feature or the SaaS workaround?
Answer: For the CRM Tax Settings feature, create a tax with a 0% rate and apply it to the exempt customer's invoice. For the SaaS workaround, create a custom tax rate with a 0% rate in Stripe and apply it to the exempt customer's subscription.
Can I use multiple tax rates with the CRM Tax Settings feature and the SaaS workaround?
Answer: Both methods allow you to create and apply multiple tax rates for different products, services, or customer locations. You can add various taxes to an invoice in the CRM Tax Settings feature. In the SaaS workaround, you can select the appropriate tax rate when editing a customer's subscription in Stripe or configure your third-party Stripe integration to apply the correct tax rate during checkout.
What happens if a customer changes their location or billing address?
Answer: You must update the customer's tax rate based on their new address for both methods. In the CRM Tax Settings feature, update the taxes on their invoice. For the SaaS workaround, update their subscription in Stripe and configure your third-party Stripe integration to automatically update tax rates during checkout.
Can I apply taxes to one-time purchases using both methods?
Answer: By adding taxes to an invoice, you can apply taxes to one-time purchases using the CRM Tax Settings feature. With the SaaS workaround, create tax rates in Stripe and use a third-party integration that supports dynamic tax calculation during checkout.
How do both methods handle refunds?
Answer: For the CRM Tax Settings feature, adjust the tax amounts manually on the refunded invoice. With the SaaS workaround, Stripe will automatically calculate and refund the correct amount of taxes based on the original transaction.
Can I generate tax reports using both methods?
Answer: The CRM Tax Settings feature does not directly provide tax reports, but you can export invoice data, including tax information, and use third-party tools or accounting software to generate tax reports. For the SaaS workaround, export transaction data from Stripe and use similar tools or software to create tax reports.
How do I handle tax changes or updates using both methods?
Answer: For the CRM Tax Settings feature, update the tax rates in your tax list and apply the updated rates to new invoices. For the SaaS workaround, revise the tax rates in Stripe and edit existing customer subscriptions to apply the updated rates. You may also need to update your third-party Stripe integration settings to ensure accurate tax calculations during the checkout process.